Getting Started With SpriteKit
Published February 14, 2015
This article was published a really long time ago.
Its value then was likely questionable. Its value now is certainly pure nostalgia.
In this introduction to SpriteKit tutorial we'll do an introduction to the framework at a high level and write code to get a feel for what's possible.
Create a SpriteKit Project
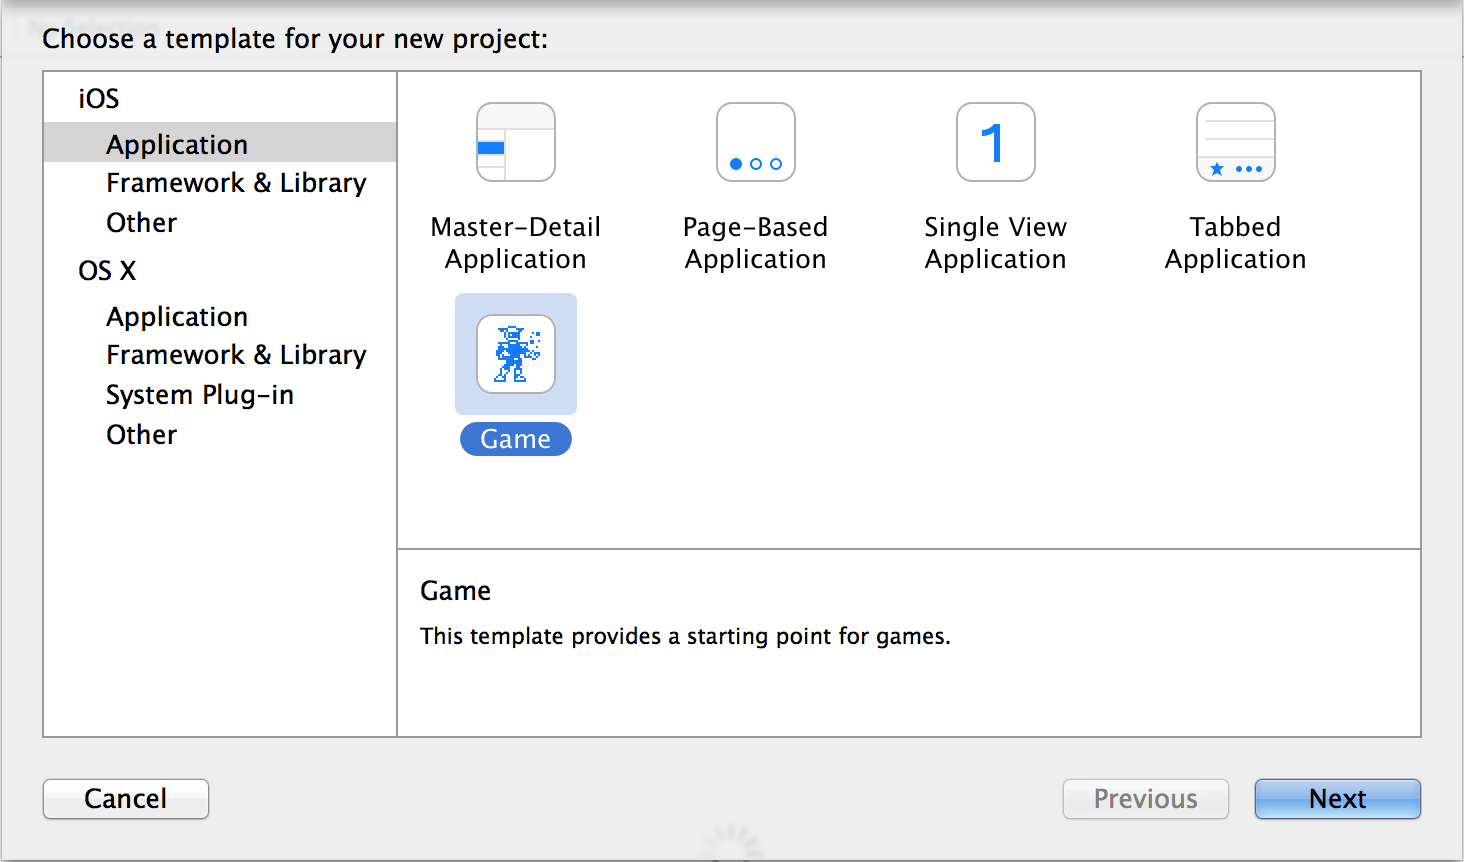
To get started with SpriteKit, create a new project in Xcode (Open Xcode -> Create a new Xcode project -> iOS, Application -> Game -> Enter anything for 'Product Name', change 'Game Technology' to SpriteKit.
You should now have a project with the following files (or a slight variation, I'm running Xcode 6.1, earlier versions might not include the GameScene.sks or LaunchScreen.xib files)
- AppDelegate.h
- AppDelegate.m
- GameScene.h
- GameScene.m
- GameViewController.h
- GameViewController.m
- Main.storyboard
- images.xcassets
- LaunchScreen.xib
If you run this project in the simulator untouched, you'll get a screen with the words "Hello World" and rotating spaceships will be added as you touch the screen.
You should stop and have a play with this project if you haven't already, but this is as far as we'll go with the default project template because we'll be trashing the lot and starting from scratch to build something similar for the sake of learning all the parts.
Delete everything we just did and start from scratch.
I've always thought the best way to learn about anything is to tear it down and rebuild it. Doing so in this case covers some fundamental knowledge needed for working with SpriteKit.
- Close (and if you like, delete) the project we created.
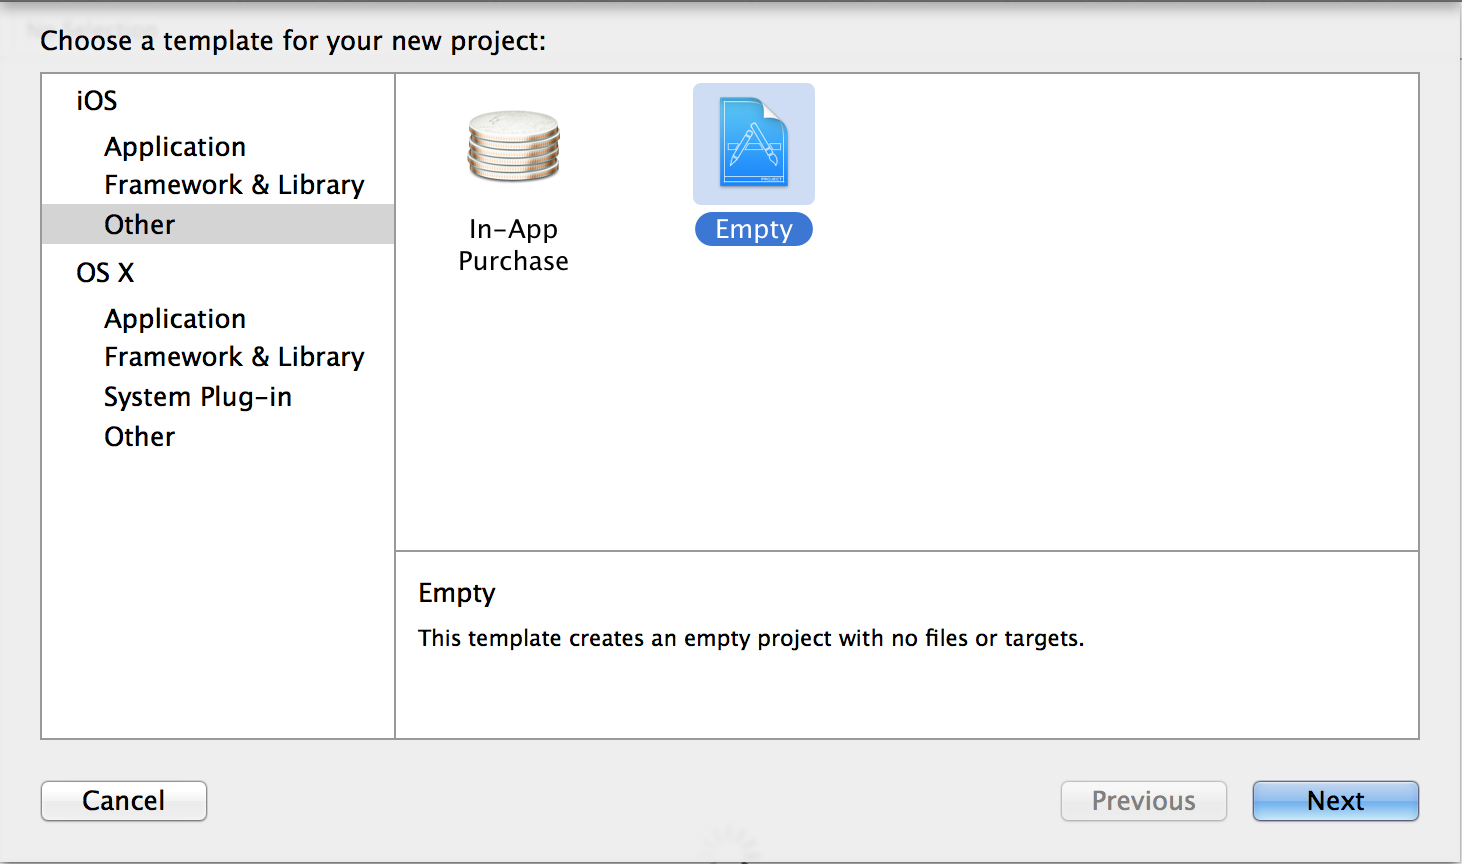
- Start a new project 'SpriteKitFromScratch', choose the 'Empty Project' template.
 3. First, we'll add a build target. Go to Editor -> Add Target and choose 'Single View Application'.
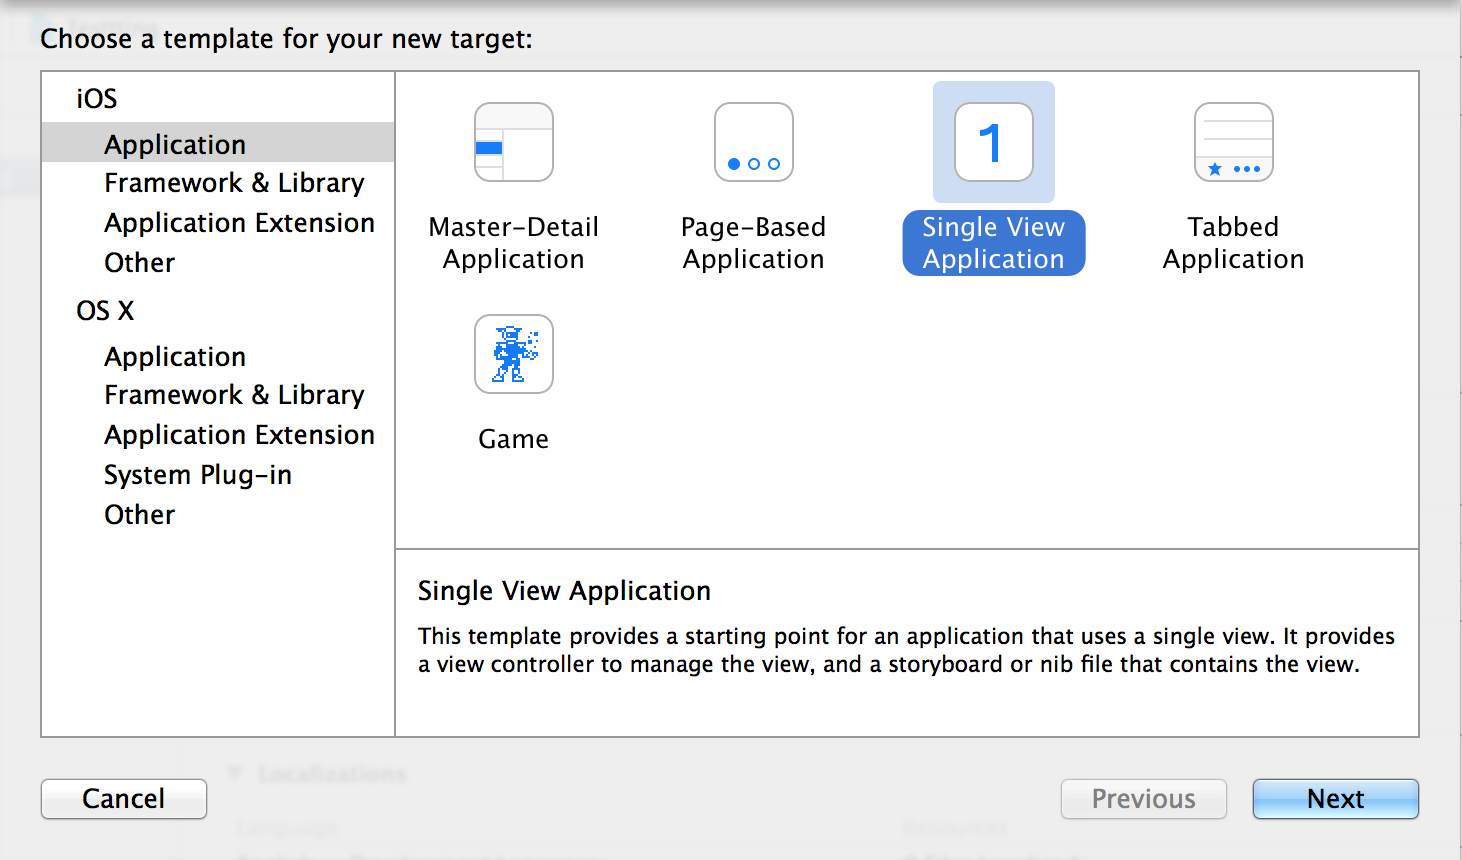 There used to be an Empty Application target though it has been removed in recent versions of Xcode, the Single View Application is the closest to empty we can get and seeing as this is SpriteKit from scratch and not iOS Apps from scratch it's a good starting point working on the assumption you are already familiar with iOS concepts like View Controllers, the App Delegate, Info.plist and Storyboards. If not, the Start Developing iOS Apps Today guide is a really good starting point for iOS development, it takes a similar 'from scratch' approach as I'm doing in this tutorial but for basic iOS app development.
From here your project should look like this:
- AppDelegate.h
- AppDelegate.m
- ViewController.h
- ViewController.m
- Main.storyboard
- images.xcassets
- LaunchScreen.xib
4. Add the SpriteKit Framework 'SpriteKit.framework' to the project.
Click the 'SpriteKitFromScratch' project in the 'Project Navigator' then from the 'Project and Targets List' (this might need to be toggled into view using the button in the top left) choose the 'SpriteKitFromScratch' target that was created when you added the 'Single View Application' target.
Click 'Build Phases'.
Expand 'Link Binary With Libraries'
Click [+] and type 'Sprite', click and add 'SpriteKit.framework'
5. Add a scene class
Click anywhere in the 'Project Navigator' and choose 'New File' from the context menu. Choose 'Cocoa Touch Class', call it 'GameScene' and make it a subclass of 'SKScene'.
The SKScene is really the main file for any SpriteKit project. It's the root of the node tree that all other nodes are added to and its contents are rendered into view by the SKView that presents the scene.
Design wise you would likely subclass your own GameScene class into distinct game levels, maintaining common functionality on a parent class and adding level specific functionality into subclasses.
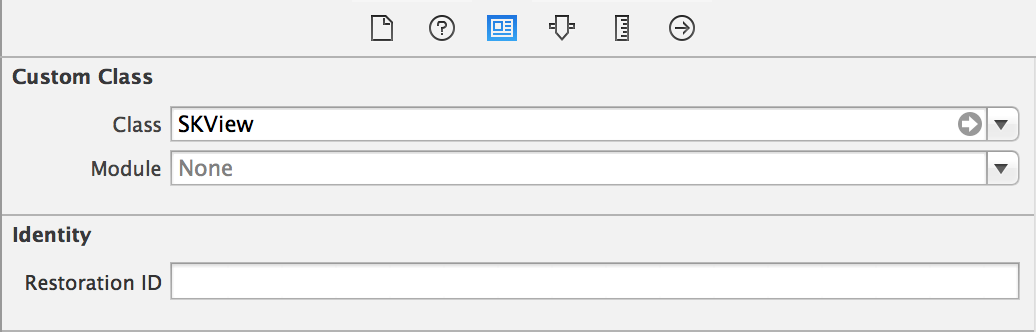
6. Open the Main.storyboard and change the type of the View to 'SKView'.
This will just change the type of the UIView in the storyboard to an SKView. You can of course just create this programatically if you want. I won't cover this because it's a lot of steps and even though this is a 'from scratch' tutorial, it's more a UIKit topic than SpriteKit.
7. Open ViewController.h
Import SpriteKit and GameScene:
#import <SpriteKit/SpriteKit.h>
#import "GameScene.h"
8. Open ViewController.m
In the viewDidLoad method which will be called when the storyboard hands control to our view controller class, we want to grab the view (in this case an SKView) and tell the view to present our GameScene.
The shows* methods are for informational debugging purposes only. They are handy to have on when learning SpriteKit as you can see how many nodes are on the screen at any one time (good when you're only expecting a certain amount) and see what affect that has on the FPS.
SKView *skView = (SKView *)self.view;

skView.showsFPS = YES;
skView.showsNodeCount = YES;
skView.showsDrawCount = YES;

[skView presentScene:[[GameScene alloc] initWithSize:skView.frame.size]];
For now we won't use the View Controller for anything other than an entry point into our GameScene(SKScene). Generally, you won't need to use the View Controller much in any SpriteKit project - for my purposes it's only came in handy when implementing features from other frameworks (i.e. Social).
9. In the game scene implementation, add a label to the scene using - (void)didMoveToView:(SKView *)view<
- (void)didMoveToView:(SKView *)view
{
  // Create an SKLabelNode, generally this is how text is displayed in SpriteKit.
  SKLabelNode *label = [SKLabelNode labelNodeWithFontNamed:@"Helvetica"];

  // Set the text property to what we want to see.
  label.text = @"Hello SpriteKit!";

  // Set the position of the SKLabelNode to be in the center of the screen.
  // The anchor point of an SKScene is 0.0, 0.0 by default, meaning if we
  // added an object with the point 0.0, 0.0 it would appear in the bottom
  // left hand corner of the screen. If we were to set it to the width and
  // height of the scene it would appear in the top right hand side of the
  // screen. In both cases we would then also have to offset for the width
  // and height of the label whose anchor point is 0.5, 0.5 by default.
  //
  // Because the anchor point of the label is 0.5, 0.5 by default we don't
  // need to offset its width and height attributes in order to make it appear
  // in the center of the screen.
  //
  // Positioning and anchor points will likely be a subject of an upcoming
  // tutorial.
  label.position = CGPointMake(self.size.width/2, self.size.height/2);

  // Add the label to the scene.
  [self addChild:label];
}
At this point if you stop and run this in the simulator you should see a scene with the words "Hello SpriteKit!".
10. Implement - (void)touchesBegan:(NSSet *)touches withEvent:(UIEvent *) event in the game scene implementation
SKScene is a responder object and therefore responds to touchesBegan, touchesEnded, etc. methods that will likely be familiar to anybody who has worked with UIKit apps before.
We'll write code to simply add a green square on the screen where ever the user touches.
- (void)touchesBegan:(NSSet *)touches withEvent:(UIEvent *)event
{
  // We just need one touch, if you want to support multi touch
  // loop through the touches collection and perform the actions
  // for each touch within it.
  UITouch *touch = [touches anyObject];

  // Get the location from the touch.
  CGPoint touchLocation = [touch locationInNode:self];

  // Create a green square.
  SKSpriteNode *greenSquare = [SKSpriteNode spriteNodeWithColor:[SKColor greenColor]
                                                           size:CGSizeMake(40.0, 40.0)];

  // Name the object, this comes in handy.
  greenSquare.name = @"square";

  // Set the location of the square to the location the user touched.
  greenSquare.position = touchLocation;

  // Add the node to the scene.
  [self addChild:greenSquare];
}
Run this in the simulator and click (touch?) the screen and you'll see a green square placed where you touched.
This code introduces the SKSpriteNode, which are really the building blocks of a SpriteKit project. In this instance I've instantiated an SKSpriteNode using a colour and size, but there are similar constructors for using an image or texture which calculates the size (and later on physical properties) for you.
You'll notice the green square is added in the centre of where you touched, not to the right or left. This is because the default anchor point of an SKSpriteNode is 0.5, 0.5, meaning the centre of the node is at the given position, as opposed to the bottom left (0.0, 0.0) or top right (1.0, 1.0).
We've also given the SKSpriteNode a name using its name property. This is handy for simple projects because SpriteKit gives us functions to enumerate a set of nodes based on name.
To orientate ourselves, so far we've:
- Setup a blank project
- Added an iOS target with standard App Delegate, View Controller and Storyboard in place.
- Linked the SpriteKit framework
- Converted the Storyboard view to an SKView
- Added a subclass of SKScene, GameScene
- Pulled a reference to the SKView from the Storyboard, set some debugging options on it and used it to present our GameScene
- Added a label from the SKScene in the - (void)didMoveToView: (SKView *)view method
- Added a response to touch events to add SKSpriteNodes to the scene in - (void)touchesBegan:(NSSet *)touches withEvent:(UIEvent *)event
11. Add animation using SKActions
So far we've created green squares where we touch on the screen, but they don't do anything. To make them a bit more interesting, we'll use SKActions to make the squares spin where they're placed.The SKAction class is used to create most animation effects that don't come as a direct result of physical interactions in SpriteKit. Using SKActions we can move sprites, fade them in and out of view, change their colour, change their size and even run arbitrary code against the node running the action.
Below we'll create an SKAction that rotates the node 360 degrees, then we'll wrap that SKAction in another SKAction that repeats an action forever and then we'll tell the green square to perform that action.
- (void)touchesBegan:(NSSet *)touches withEvent:(UIEvent *)event
{
  // We just need one touch, if you want to support multi touch
  // loop through the touches collection and perform the actions
  // for each touch within it.
  UITouch *touch = [touches anyObject];

  // Get the location from the touch.
  CGPoint touchLocation = [touch locationInNode:self];

  // Create a green square.
  SKSpriteNode *greenSquare = [SKSpriteNode spriteNodeWithColor:[SKColor greenColor]
  size:CGSizeMake(40.0, 40.0)];

  // Name the object, this comes in handy.
  greenSquare.name = @"square";

  // Set the location of the square to the location the user touched.
  greenSquare.position = touchLocation;

  // Create an action that makes the square spin.
  SKAction *turn = [SKAction rotateByAngle:360.0 duration:1];

  // Wrap the action in a repeatActionForever Action and tell the square to run
  // that action.
  [greenSquare runAction:[SKAction repeatActionForever:turn]];

  // Add the node to the scene.
  [self addChild:greenSquare];
}
Run this in the simulator and see the effect it's had on our green squares.
12. Add basic physics using SKPhysicsBody
Physics is added to a node through the physicsBody of the node, an instance of SKPhysics body is instantiated and assigned to the property and the presence of this SKPhysicsBody instance makes the SKScene evaluate the node as part of the Physics Word.The Physics World is automatically created when you instantiate an SKScene with default values that mimic real world properties.
gravity: 0.0, -9.8 (CGVector) speed: 1.0 (CGFloat)
The speed is the speed of simulation, changing the speed to 2.0 will effectively double the speed of all physics simulations.
After you've completed the other steps in this project, try changing the gravity and speed properties of the SKPhysicsWorld of your SKScene to see the affect.
self.physicsWorld.gravity = CGVectorMake(0.0, -4.4);
self.physicsWorld.speed = 2.0;
You can modify these properties to simulate different environments or create specific effects for your project.
- (void)touchesBegan:(NSSet *)touches withEvent:(UIEvent *)event
{
  // We just need one touch, if you want to support multi touch
  // loop through the touches collection and perform the actions
  // for each touch within it.
  UITouch *touch = [touches anyObject];

  // Get the location from the touch.
  CGPoint touchLocation = [touch locationInNode:self];

  // Create a green square.
  SKSpriteNode *greenSquare = [SKSpriteNode spriteNodeWithColor:[SKColor greenColor]
  size:CGSizeMake(40.0, 40.0)];

  // Name the object, this comes in handy.
  greenSquare.name = @"square";

  // Set the location of the square to the location the user touched.
  greenSquare.position = touchLocation;

  // Create an action that makes the square spin.
  SKAction *turn = [SKAction rotateByAngle:360.0 duration:1];

  // Wrap the action in a repeatActionForever Action and tell the square to run
  // that action.
  [greenSquare runAction:[SKAction repeatActionForever:turn]];

  // Make this a physical object affected by gravity.
  greenSquare.physicsBody = [SKPhysicsBody bodyWithRectangleOfSize:greenSquare.size];

  // Add the node to the scene.
  [self addChild:greenSquare];
}
You create SKPhysicsBodys the size of the node you want to create physical interactions with, the interactions are based off the physics body, not the node. Physics Bodys can be created using the size property of their parent node, by combining other physics bodies, using polygons, circles or even textures (imagine creating a body for an octopus).
Now that our green squares have a physics body they will be subject to the physical properties of the physics world. So when we touch the screen to add a square, it should now start falling directly downward (remember the gravity vector is set to 0.0, 0.9).
13. Create some physical interactions between nodes
We're going to do this by adding a physics body to the "Hello SpriteKit!" label we created earlier.- (void)didMoveToView:(SKView *)view
{
// Create an SKLabelNode, generally this is how text is displayed in SpriteKit.
SKLabelNode *label = [SKLabelNode labelNodeWithFontNamed:@"Helvetica"];
// Set the text property to what we want to see.
label.text = @"Hello SpriteKit!";
// We create a physics body the same size as the label.
label.physicsBody = [SKPhysicsBody bodyWithRectangleOfSize:label.frame.size];
// Setting the dynamic property to no will cause the node to become static.
// Meaning the node will be unaffected by physical interactions.
label.physicsBody.dynamic = NO;
}
Simply adding a physics body to the label node is enough to cause it to interact with other physics body nodes because by default the physics node is set to interact with all other nodes.
This can later be changed using the categoryBitMask, collisionBitMask and collisionTestBitMask properties which we'll explore further in an upcoming tutorial.
Setting the dynamic property of the physics body causes the body to not be affected by physical interactions with other nodes. This means when it collides with a green square, it will not be displaced. It is also unaffected by the gravity of the physics world. Setting the dynamic property to YES (default) will cause it to fall to the ground immediately.
We could set the property of dynamic to NO and set the affectedByGravity property to NO and the label would stay put until displaced by the green squares. I've left both these properties in the Github source so you can easily play with the different combinations to see the effect.
14. The update method
No introduction to SpriteKit would be complete without mention of the update method. The update method is called at the beginning of each revolution of the rendering loop. The update method is very powerful because no matter what actions you have applied or what physical interactions are about to occur you can make adjustments to any part of your scene before actions and physics are evaluated.We'll use the update method to do make some arbitrary changes to our scene. For every call to the update method, we'll enumerate all our green squares using the name we gave them toward the beginning of the tutorial. We'll check the position of each of the green squares, for each square that has fallen off the bottom of the screen we'll send it flying back up toward the top of the screen and change its colour. For every node that has shot off the top of the screen, we'll ensure it is removed from existence.
- (void)update:(NSTimeInterval)currentTime
{
  [self enumerateChildNodesWithName:@"square" usingBlock:^(SKNode *node, BOOL *stop) {
  if(node.position.y <= 0)
    {
      // Create an action that sends the square to the top and out of view.
      SKAction *goToTop = [SKAction moveToY:self.size.height+node.frame.size.height/2
                                   duration:2.0];

      // Create an action that changes the square's colour.
      SKAction *changeColour = [SKAction colorizeWithColor:[SKColor blueColor]
                                          colorBlendFactor:0.7 duration:2.0];

      // Combine the above 2 actions using a group.
      SKAction *goToTopAndChangeToBlue = [SKAction group:@[goToTop, changeColour]];

      // Remove the physics body to allow the above action to run unhindered.
      node.physicsBody = nil;

      // Run the action group.
      [node runAction:goToTopAndChangeToBlue];
    }

    if(node.position.y < self.size.height)
    {
      // Generally this is done automatically, but better safe than sorry.
      [node removeFromParent];
      NSLog(@"square removed");
    }
  }];
}
It's important to note the performance cost of enumerating through a list of nodes every time the frame is updated (this can be up to 60 times a second). In this case we won't notice any drop in performance, but in a project with a bit more going on, you might want to use the currentTime parameter the update method has passed to it to ensure you don't run any expensive algorithms more often than necessary.
Build and run in the simulator to see the result.
That's it. I hope this tutorial has been a real hoot. I've written it in a way that teaches what I feel are some of the fundamentals of SpriteKit but that hopefully also encourages experimentation. Rather than having copied lines of code verbatim to recreate Flappy Bird, you should instead have some vital SpriteKit knowledge and a codebase that provides a solid foundation to experiment.
If you're looking for some things to experiment with, the following properties of these types are good candidates with this project.
- SKScene
- scaleMode
- physicsWorld (SKPhysicsWorld)
- SKNode
- zPosition
- alpha
- physicsBody (SKPhysicsBody)
- intersectsNode:
- SKSpriteNode
- anchorPoint
- color
- colorBlendFactor
- blendMode
The source code for this tutorial is available on Github.